Creating NgSurvey Extension
Introduction
NgSurvey extensions are the easiest way to add custom functionality to the surveys. For example, you can create an extension that can directly stream the responses data to your customer service. The extensions are the simple WordPress plugins that make use of NgSurvey API functions to achieve the desired functionality.
For this documentation, let us take a very simple example of adding our custom message (which may be loaded from a database or some external source) to the response after the user completing the survey response. Although it is a very simple example, we go through a full-blown plugin structure that enables us to create more complex extensions.
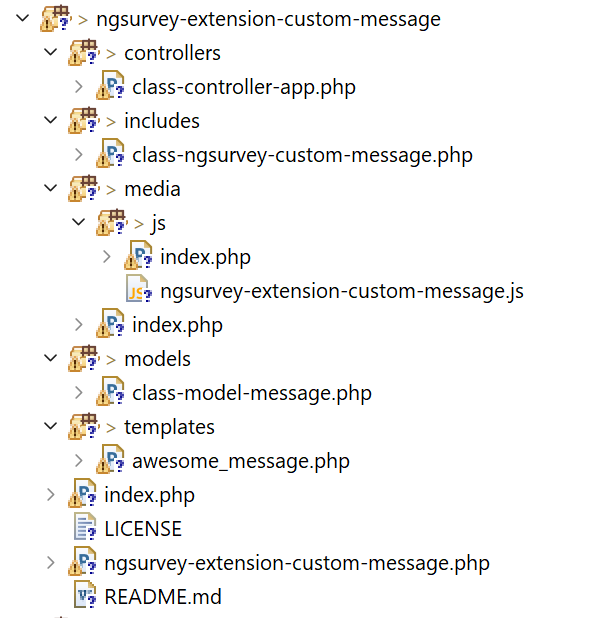
Our plugin directory structure
Basics
As the extension is a WordPress plugin, its main file starts with the standard WordPress plugin header like below.
<?php
/**
 * NgSurvey extension to add our owesome custom message to the end message of the user response.
 *
 * @link              https://ngideas.com
 * @since             1.0.0
 * @package           NgSurvey
 *
 * @wordpress-plugin
 * Plugin Name:       NgSurvey Extension - Awesome Message
 * Plugin URI:        https://ngideas.com/
 * Description:       This is NgSurvey extension to add custom message after the survey response.
 * Version:           1.0.0
 * Author:            NgIdeas
 * Author URI:        https://ngideas.com/
 * License:           GPL-2.0+
 * License URI:       http://www.gnu.org/licenses/gpl-2.0.txt
 * Text Domain:       ngsurvey-extension-custom-message
 * Domain Path:       /languages
 * NgSurvey Type:     Extension
 */
After declaring our header, we need to run our plugin. We don’t define our plugin code in this main file, instead delegate it to our includes classes. Add the following code after the above header.
defined( 'ABSPATH' ) || exit;
require_once 'includes/class-ngsurvey-custom-message.php';
$NgSurvey_Custom_Message = new NgSurvey_Custom_Message( __FILE__ );
Now we define our actual plugin logic in our include class in includes/class-ngsurvey-custom-message.php file.
We make use of several filters and action hooks defined by NgSurvey to extend the functionality in our plugin. For this specific plugin functionality, we are interested in one such filter ngsurvey_end_of_survey_message. This filter is triggered in the finalize response method to filter the message shown to the user after the completion of the survey response. The function receives the HTML message string object which we override to display our own message. So let us define the plugin hooks in the constructor of the class NgSurvey_Custom_Message.
/**
 * Construct the plugin.
 */
public function __construct( $plugin_file ) {
    $this->pluginFile = $plugin_file;
    $this->slug = basename( $plugin_file, '.php' );

    // Initialize the plugin events
    add_action( 'plugins_loaded', array( $this, 'init' ) );
}

/**
 * Initialize the plugin.
 */
public function init() {
    // First make sure NgSurvey is installed, or else we do not add our hooks.
    if( ! defined( 'NGSURVEY_PATH' ) ) {
        add_action( 'admin_notices', array ( $this, 'need_ngsurvey' ) );
        return;
    }

    // Now load all classes
    include_once trailingslashit( plugin_dir_path( dirname( __FILE__ ) ) ) . 'controllers/class-controller-app.php';

    // Define our controller to perform the task
    $controller = new NgSurvey_Custom_Message_Controller();

    // Add hidden menu item so that we can display the invitations page there
    add_action( 'ngsurvey_end_of_survey_message', array( $controller, 'show_awesome_message' ), 10, 3 );
}

/**
 * A notice to show when the plugin is loaded without NgSurvey loaded.
 *
 * @return string Fallack notice.
 */

public function need_ngsurvey() {
    $error = sprintf( esc_html__( 'NgSurvey Custom Message requires %sNgSurvey%s to be installed & activated!' , 'ngsurvey-extension-custom-message' ), '<a href="http://wordpress.org/extend/plugins/ngsurvey/">', '</a>' );
    $message = '<div class="error"><p>' . $error . '</p></div>';
   echo $message;
}
Our controller class is a standard PHP class that is extended from the abstract class NgSurvey_Controller or NgSurvey_Extension provided by NgSurvey.
By extending from NgSurvey_Extension class, we will have few important functions available to our plugin such as loading the custom JavaScript file into the NgSurvey scripts order, and define our own settings if needed. Those concepts are out of the scope of this documentation and we shall go ahead and implement our controller as shown below.

By extending from NgSurvey_Controller class, you can load a modal class to access the database. So we use this to load our message.
/**
 * The main application class of the app.
 *
 * This is used to define custom message app controller class.
 *
 * @package    NgSurvey
 * @author     NgIdeas <support@ngideas.com>
 * @license    https://www.gnu.org/licenses/gpl-3.0.txt GNU/GPLv3
 * @link       https://ngideas.com
 * @since      1.0.0
 */
class NgSurvey_Custom_Message_Controller extends NgSurvey_Controller {

    /**
     * Initialize plugin
     *
     * @param array $config the configuration, if any.
     *
     * @since    1.0.0
     */
    public function __construct( $config = array() ) {
        $config = array_merge( $config, array(
            'name'          => 'custom-message',
            'title'         => __( 'Custom Message', NGS_IMPEXPTM ),
            'template'      => new NgSurvey_Template_Loader(array(
                'plugin_directory' => plugin_dir_path( dirname( __FILE__ ) ),
                'theme_template_directory' => plugin_basename( dirname( __DIR__ ) ),
                'filter_prefix' => 'ngsurvey-extension-custom-message'
            )),
        ) );

        parent::__construct( $config );
    }
}
Now we need to write our controller function defined in the filter hook “show_awesome_message“. This function can make use of a modal class to fetch the custom message and return it to NgSurvey.
/**
 * The handler function to filter the end of survey response message.
 *
 * @param string $message the filtered message
 *
 * @return string $message the updated message
 */
public function show_awesome_message( $message, $survey, $response_id ) {
    // Create our message modal class instance
    $model = $this->get_model( 'message', 'NgSurvey_Custom_Message_Model_' );

    // Fetch the message from the modal
    $message = $model->getMessage();

    // Return the final message
    return $message;
}
Finally, we define our modal class which does the job of fetching the message from wherever we want. For this documentation purpose, we simply return a static HTML message from our layout file awesome_message.php.
/**
 * The custom message model class.
 *
 * This is used to define custom message model data.
 *
 * @package    NgSurvey
 * @author     NgIdeas <support@ngideas.com>
 * @license    https://www.gnu.org/licenses/gpl-3.0.txt GNU/GPLv3
 * @link       https://ngideas.com
 * @since      1.0.0
 */
class NgSurvey_Custom_Message_Model_Import extends NgSurvey_Model {
    /**
     * Define the import model functionality of the plugin.
     *
     * @since    1.0.0
     */
    public function __construct($config = array()) {
        parent::__construct($config);
    }

    public function getMessage() {
    	$template = new NgSurvey_Template_Loader(array(
    		'plugin_directory' => plugin_dir_path( dirname( __FILE__ ) ),
    		'theme_template_directory' => plugin_basename( dirname( __DIR__ ) ),
    		'filter_prefix' => 'ngsurvey-extension-custom-message'
    	));

    	ob_start();
    	$template->get_template_part( 'awesome_message' );
    	$message = ob_get_clean();

    	return $message;
    }
}
And our layout file (awesome_message.php) contains a simple message without any bells and whistles.
<div id="ngs">
	<p>You are awesome, thank you for providing us your valuable feedback!</p>
</div>
Our NgSurvey extension is ready to roll. Pack the folder into a zip file and install it through the WordPress installer. The full source code of plugin described in this documentation is available on this GitHub repository.